Add Panopto to the Canvas course room
Panopto should be enabled automatically and appear in the course navigation menu. If it is not shown in the menu on the left, follow these steps to add it to your course. You must be a course administrator or have a similar role to do this.
- If Panopto is not shown in the course navigation menu on the left, select Settings (Fig. 1).

Fig. 1
- Select the Navigation tab. Check whether Panopto is listed under “Drag items here to hide them from students”. If it is, drag and drop it into the course navigation menu and select Save (Fig. 2).

Fig. 2
3. Panopto Video will now appear in the course navigation menu on the left.
.png)
Fig. 3
Create a new recording
1. In the Panopto Video window in Canvas, select Create.

Fig. 4
2. In most cases, you will use a UiO computer. Select Panopto for Windows, then select Open Panopto in the new window. You can also record directly in a browser or record on a Mac.


Figs. 5 and 6
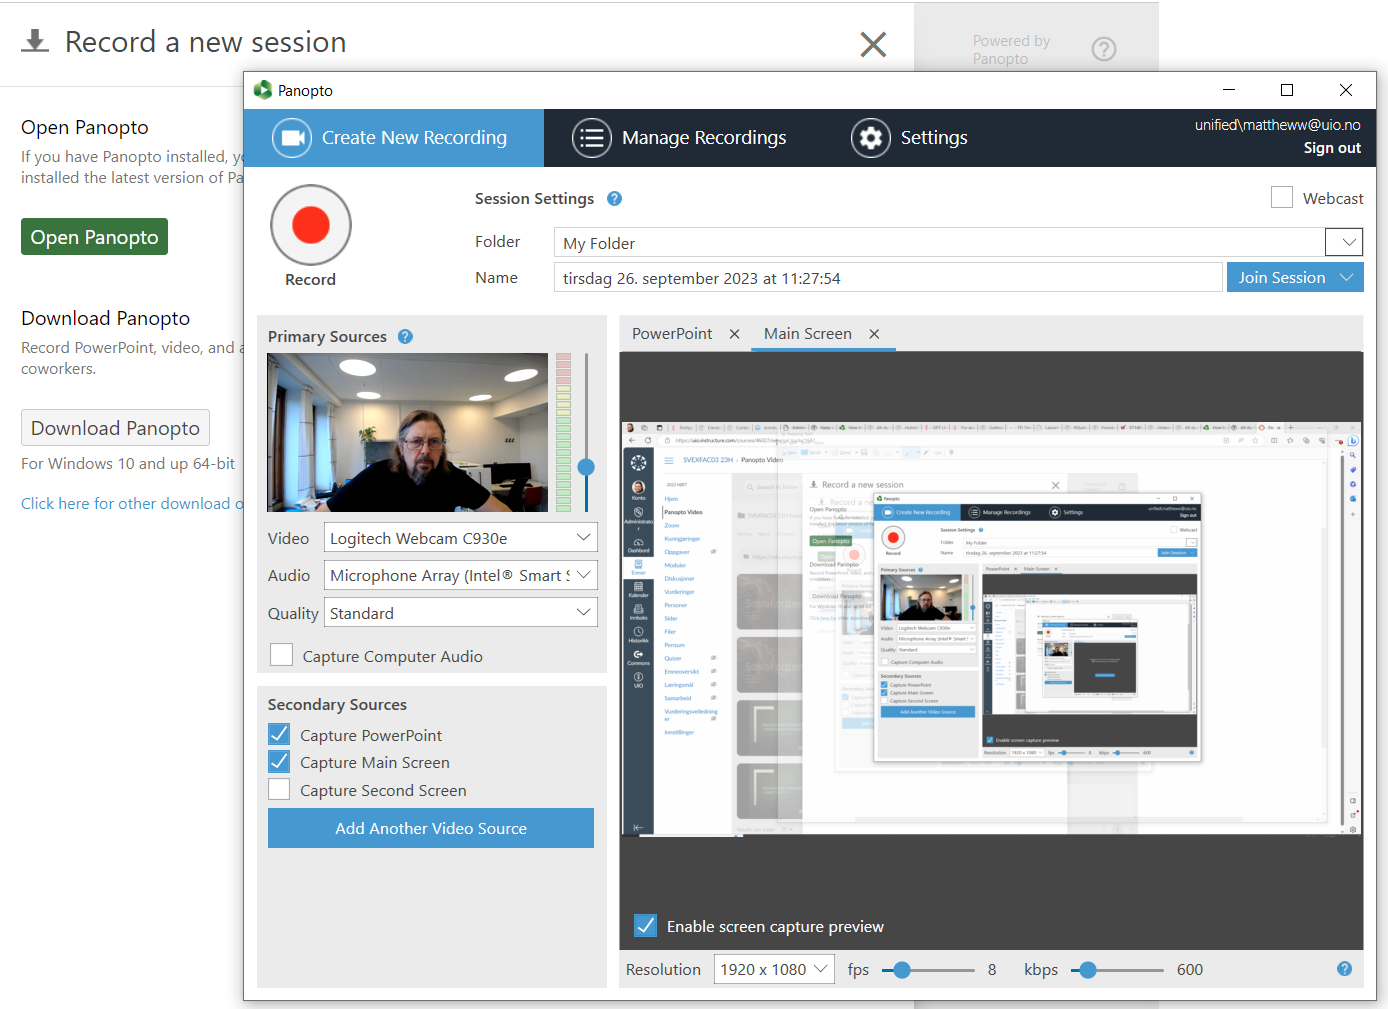
3. The Panopto application installed on your computer will now open (see Fig. 7).

Fig. 7
Select video, audio and secondary sources
- Give your recording a name. At the top of the recording window, enter a name in the Name field. You can use the title of your presentation.
- Select your sources under Primary Sources.
- Video: Select your camera, or select no camera. If you use a document camera, set the quality to High or higher to ensure sufficient resolution.
- Audio: Select your microphone and check the sound level in the volume meter.
- Secondary sources: If you have a PowerPoint presentation open, Panopto can automatically include it and open it when you start recording, provided that you have selected the PowerPoint option. You can also select your main screen if you plan to use several applications during the recording.

Fig. 8
- You are now ready to start recording.
Record your lecture
- Press the red record button in the top-left corner to start recording. Your PowerPoint presentation will open automatically, and you can begin teaching.

Fig. 9 - We recommend recording your lecture in two sessions. Name the two sessions clearly to show that they are parts of the same lecture, for example lecture_part1 and lecture_part2.
- To stop recording after part one, press the stop button in the top-left corner of Panopto. After the break, you can start a new recording with the same settings.

Fig. 10 - Panopto uploads the recording while you record. The upload should be complete within one or two minutes after the lecture ends.
- The recording will be available to students in Canvas shortly afterwards, unless you have selected manual publishing. See How to Publish Videos Using the Availability Workflow.
Captions for recordings
Automatic captions for videos have improved significantly in recent years, both in English and Norwegian. In many cases, it is fine to publish videos with automatically generated captions that have not been edited manually.
There are several ways to add good captions:
- Use automatic captions in Panopto. UiO’s Autotekst service is available in Panopto and can be selected in Canvas (see Fig. 1).
- Add captions manually by editing the video. See How to Manually Caption Sessions in the Editor.
- Use UiO’s Autotekst service. This gives the same result as selecting the service directly in Canvas.
- Download the audio from the Panopto recording as an MP4 file. See How to Download Video or Audio Streams as MP4s (step 2 on the page).
- Upload the audio file to Autotekst and generate captions. You can also see the guide Create text from an audio or video file in Autotekst. Choose the
.srtor.vttfile format. - Upload the caption file to Panopto. See How to Upload a Caption File for a Video.
- Correct any errors in the captions. See How to Edit or Delete Captions.

Fig. 1
Simple editing of a recording
If you want to remove part of a recording, for example a section with student participation, you can easily trim it. It is best to do this before adding captions. See How to Trim a Video in the Editor.